Signal LCC Firmware C7c Update.
Signal LCC Boot fixer:
The Signal LCC boot
fixer upgrade will repair an issue that caused the Signal LCC to jump
into boot mode if the power supply rise time is too slow. Make a backup
of your CDI configuration and then install the boot loader upgrade prior
to installing the C7c update. Click
here for more information.
Be sure that you are using JMRI version 4.8 or later.
Using Firefox, Google
Chrome, or Safari, (NOT Microsoft Edge) download the latest firmware.
(e.g. 'SignalLCC_C7c_UPDATE.hex')
C7c Updates Include:
- Correction to the LCC query
behavior on the cascade items. The original behavior could cause
cascaded turnouts to randomly change positions when another node such
as JMRI signed onto the network after a cascaded route has been set.
- Added a new "Cascade" option
to simplify the setup of cascaded turnouts.
- Re-ordered some CDI display
items for clarity.
C7a Updates Include:
- Bug fix for C7. (manufacturer's release only)
- C7a includes format changes to improve usability with the iPhone CDI.
- C7a also brings the Tower LCC and Signal LCC release numbers into
alignment.
- Note that the C7a upgrade will update your existing
configuration data which is stored in a different NVR chip. Be sure
to do a node backup both before and after making this upgrade.
C6c
Updates Include:
- Added a back door to reset the CDI to factory defaults in the field.
(used if you get the unit into a tight loop and can not escape)
- Note that the C6c upgrade will update your existing configuration data
which is stored in a different NVR chip. Be sure to do a node backup
both before and after making this upgrade.
The way the back door works is as follows:
- power down the node;
- press the GOLD button while powering up, the GOLD led should start to
blink @ 1 Hz, then release;
- the node is now in boot loader mode -> download the appropriate
UPDATE firmware (attached);
- toward the end of the download, press and hold the BLUE button;
4a) should step 4 be skipped, the node starts up with CDI values as they
were before, so the event loop restarts;
4b) in this case, power down the node and press and hold the BLUE button
while powering up;
- hold the BLUE button for at least 15 seconds, until the GOLD, BLUE and
RED led starts to flicker;
- release the BLUE button, done!
C6b
Updates Include:
- both delay times in I/O-section wouldn't properly clear when set to 0
seconds or 0 minutes (solved)
- read only transmitter circuit events could not be updated with the
same events from a replacement node (solved)
- datagrams requiring a reply didn't send an acknowledge with reply
pending (solved)
C6a
Updates Include:
- C6a is a bug fix for an obscure combination of actions failing to send
its EventIDs.
- The C6 CDI has simplified the 'Output Function' and 'Input Function'
options to clarify their results. The ability of the node to support
bi-directional line use has been improved. (Sample Mode) Note: Sample
mode requires that any input line include a 1K series resistor in its
circuit to prevent output port driver damage by direct connections to 5V
or 0V levels. (such as with a push button or contact) Any input lines
used without this resistor must never have the [Output Function]
enabled. Warning! I/O Port damage may result if this restriction is
not honored.
- The C6 upgrade adds an action option to cascade 'Group' conditionals.
This now allows logic functions of the form '(V1a OR V2a) AND (V1b OR
V2b)', '(V1a AND V2a) OR (V1b AND V2b)', or similar to be formed by
combining successive conditionals. For proper operation be sure to add
the same options to both the 'when true' and 'when false' actions of the
conditional being extended.
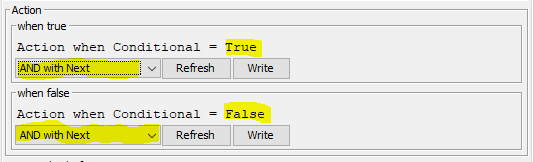
Any 'Blocked' conditionals will be skipped over by the combining logic.
Be sure to not specify [AND with Next] or [OR with Next] on a 'Last
(Single)' conditional because it would have no practical results.
- Be sure to restart JMRI after doing this upgrade, because JMRI caches
the CDI display information, and the CDI format changes will not appear
until JMRI restarts and reloads the new display data from the upgraded
node.
- This Version C6 update does convert your previous line configuration
options into the new format automatically, but this is not reversible
back to C5. To revert to C5 load the C5 firmware, then restore your
configuration from your C5 backup file.
- Be sure to create a new C6 backup file after doing the C6 upgrade
because the backup file format has changed with this new version.
C5
Updates Include:
- We have repaired a bug in the C4 CDI that incorrectly restored the
individual lamp control settings and comments.
C4
Updates Include:
- We have changed the power initialization process to allow a node to
initialize and operate with no other nodes present. This will allow
small installations such as demo layouts and modules to operate without
any other nodes or JMRI present. The node does require a power supply
and terminators to be connected.
C3
Updates Include:
- In the CDI Configuration Tool, there is a new Segment that allow you
to individually control each output lamp. In that segment you choose if
the lamp is part of a mast, or individually controlled. Do not attempt
to control a lamp as part of a mast and individually. Results will not
be correct for either.
C2
Updates Include:
- In the CDI Configuration Tool, writing the Node Description field
erased the I/O-Line-1 Description field; now fixed;
- A Node Power Monitor is added; the R/B/G leds remain lit if the node
voltage is above 3.0V, but below ~4.4V and the node will not startup;
- If the node voltage is above ~4.4V for more than 1 second, the R/B/G
leds will go dark, the node initializes its alias and starts normal
operations;
- If the node voltage drops below ~4.4V, the node is de-initialized and
a user-configurable (optional) 'PowerNotOk' event message is sent
(power_option > 0); the node reboots within 50ms (de-initialization
means the node inhibits all CAN-bus messages (except 'PowerNotOK') and
FRAM read/writes); the PowerNotOK eventID is stored in EEPROM, so it
doesn't need to access FRAM in a low power situation;
- On reboot from PowerNotOK (brown-out), the well-known 'Node Power
Failed' message and user-configurable (optional) 'PowerOK' message are
sent;
- On (re)boot from any other event (power on, reset message, firmware
download, factory reset) these 'power-failed' messages will not be sent;
- The node Alias is now saved to EEPROM; upon (re)boot this stored alias
will now be used instead of freshly allocating it from the NodeID and
risking an alias 'collision' with other nodes, causing multiple nodes to
re-allocate their alias; this can be useful on CAN-bus power dropouts,
where one (or more) node(s) may reboot where others continue to operate;
- The CDI XML is partially re-written to get rid of the 'Child'
references in the CDI Configuration Tool;
- All previous updates and fixes through C1e.
- Flasher synchronization.All lamps on the same mast now flash together.
(per the prototype)
IMPORTANT NOTICE: Because the CDI now has new CDI items, all
existing CDI backup files created with older node firmware (before rev.
C2) have become outdated. The C3-UPDATE doesn't affect your existing
configuration at all, so it is strongly advised to create a new backup
file immediately after updating to rev. C3.
Firmware
Update process:
Note: This version of the Signal LCC update loads both
the new firmware and
the new CDI at the same time. This means that you
will no longer need to do a dual upgrade as was previously required for
the early versions of the Signal LCC.
When ever an update to your Signal LCC firmware is needed, a
program such as "Firmware Update" in JMRI version 4.14 or later is
required. Download the latest firmware files to your local JMRI User
Files folder or someplace where you can easily access it.
To enter Firmware update mode:
-
Start JMRI and select "LCC".
- Select ‘Firmware Update’
from the LCC drop down list.
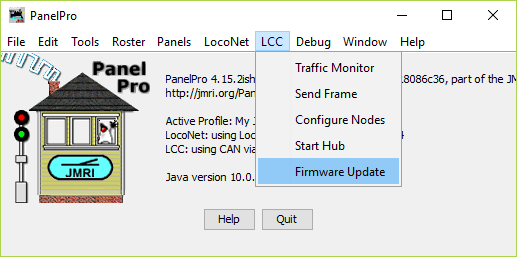
-
Click ‘Select’ to pick a firmware file.
- From the file menu, select: 'SignalLCC_C6a_UPDATE.hex'
or the latest upgrade available.
- Select your 'Target Node ID'.
- Optionally you may check the
‘Lock Node’ check box to take the node off line during the upgrade.
- Click the 'Load' button to
initiate the download to Signal LCC revision C3.

- Wait until 'updating device
firmware..' progress bar is complete and shows 'Operation Complete'.
- Once the operation is
complete, open the OpenLCB Network Tree window. (LCC-Configure Nodes)
Then click on 'Open Configuration dialog for the just updated node.
- The updated node should now
show 'Mod: Signal-LCC' and 'Software Version: rev-C5' in the Network
Tree view, and Software Version: rev-C5 in the CDI view.
- Any errors will be shown in
the lower window ticker tape display.
Normally
upgrades to the Signal LCC node may be accomplished without actually
accessing the board itself. However if the node does not automatically
enter boot mode and start the upgrade it may be forced into boot mode
by un-powering it, then holding down the ‘Gold’ button as you power it
up again. The gold LED should start flashing to indicate that it is in
forced boot mode. This will also likely be required after a failed
upgrade attempt.
Note:
Old images do not correctly reflect this version upgrade.